
Glenn Gray
Solution Architect
Real-World Case Study: A Practical Blueprint for Streamlined Software Development

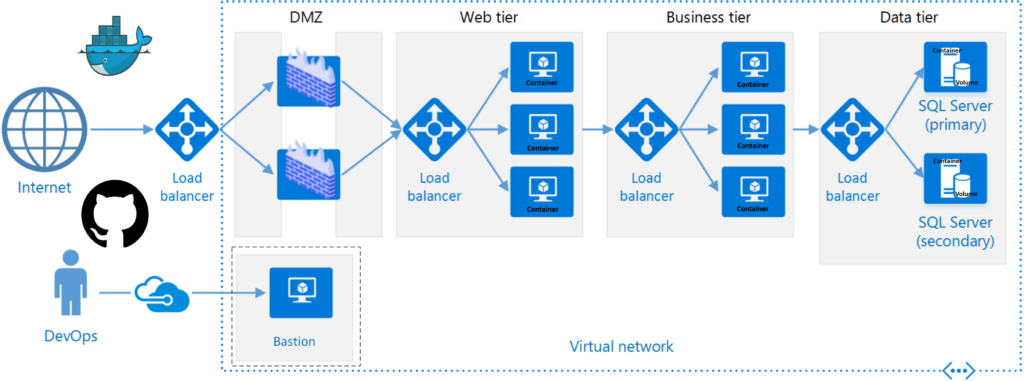
In the fast-paced realm of software development, where innovation is constant and timelines are tight, developers, DevOps engineers, and project managers find themselves navigating a complex landscape. The demand for accelerated development cycles clashes with the intricacies of managing underlying infrastructure efficiently. Picture this: You’re a developer eager to dive into your next project, but the overhead of setting up infrastructure and wrestling with intricate configurations becomes a roadblock. This is where the imperative to streamline software development processes becomes apparent. By commoditizing foundational resources and embracing a 3-tier microservice-based approach, developers can discover pre-configured frameworks that not only accelerate their cycles but also harmonize with the broader needs and policies of their organizations.
As a former Network Engineer at Comcast, I vividly recall the challenge of collaborating with Software Developers to automate infrastructure software updates to deploy or enhance applications. The struggle was the demand for accelerated development cycles clashed with the intricacies of managing underlying infrastructure efficiently. That’s when we embraced a streamlined software development process. By initiating a project to commoditize the foundational resources and leveraging Docker instances, code repositories (GitHub), and container images (Docker Hub), we dramatically reduced time-to-deliver from 5 days to a mere 5 minutes. The impact was transformative, resulting in the tangible benefits of adopting a lightweight, microservice-based approach. The rest of this article will outline the generic project details including: technology stack, core features, workflow, and a breakdown of the components and how they work together. It will mention security measures, testing, and deployment, but in the interest of keeping the article to a reasonable length, these topics will not be covered in great detail.
Project Technology Stack
- CI/CD: GitHub, Docker Hub
- Web Tier Container: Angular
- Business Tier Container: Node.js
- Data Tier Container: MongoDB
Project Structure and Version Control
Create a directory structure for your project. Note that the example below shows file directories for mongo-db, app-server, and web-server:
.
├── README.md
├── mongo-db
├── app-server
└── web-server
Initialize Git Repository and Connect to GitHub:
# Navigate to the root directory of your project
cd /path/to/project

# Initialize Git repository
git init

# Add remote origin for GitHub repository
git remote add origin git@github.com:tallgray/MeanStack.git

# Verify the remote connection
git remote -v

# Create an initial commit
git add .
git commit -m "Initial commit"

# Push the code to GitHub
git push -u origin master
Core Project Features
- Infrastructure Management with Docker Hub: Offer tools for provisioning and managing Docker infrastructure.
- Code Repository Management with GitHub: Integrate with version control systems using Git. Provide code review and collaboration features.
- CI/CD Integration with Docker Compose: Automate build and deployment processes. Integrate with testing frameworks for continuous testing.
Continuing our DevOps journey through streamlined software development, let’s delve into the nuts and bolts of creating a lightweight, microservices-based stack that powers the transformative development cycles we’ve been discussing. In the dynamic landscape of modern development, where agility is paramount, the deployment process plays a pivotal role. Docker Compose emerges as the orchestrator, seamlessly weaving together the intricacies of MongoDB, Express.js, and Nginx into a cohesive and efficient structure.
1. MongoDB, the Data Powerhouse
Our MongoDB service is the database tier container responsible for managing the storage of our valuable data. Docker Compose can initialize the database, thanks to the ‘init-mongo.js’ script, and ensures its persistence through mounted volumes. These volumes act as the archives, safeguarding the data even as containers come and go.
# ./docker-compose.yaml file
version: '3.7'

services:
  mongo-db:
    build:
      context: ./mongo-db
      dockerfile: Dockerfile
    container_name: ${PROJECT}-mongo-db
    ports:
      - ${DATA_PORT}:${DATA_PORT}
    env_file:
      - .env
    networks:
      BRIDGE:
    volumes:
      - mongo-db:/data/db
2. Express.js, the Brain of Business Logic
Our business tier, powered by Node.js and Express.js, connects to the MongoDB database and exposes API endpoints. Docker Compose ensures the seamless interplay between the web and data tiers, defining the necessary connections and dependencies.
# ./docker-compose.yaml file (continued)
  app-server:
    depends_on:
      - mongo-db
    build:
      context: ./app-server
      dockerfile: Dockerfile
    container_name: ${PROJECT}-app-server
    ports:
      - ${BUSINESS_PORT}:${BUSINESS_PORT}
    env_file:
      - .env
    networks:
      BRIDGE:
      LAN:
        ipv4_address: ${BUSINESS_IPV4}
    healthcheck:
      test: ["CMD", "curl", "-f", "http://localhost:${BUSINESS_PORT}"]
      interval: 30s
      timeout: 10s
      retries: 3
3. Nginx, the Gateway to the World
Nginx, our web tier container, acts as a gateway, forwarding requests to the Express.js backend. Docker Compose ensures the seamless routing of requests, defining the paths and maintaining the cohesion of our microservices architecture.
# ./docker-compose.yaml file (continued)
  web-server:
    build:
      context: ./web-server
      dockerfile: Dockerfile
    container_name: ${PROJECT}-web-server
    ports:
      - ${WEB_PORT}:${WEB_PORT}
    env_file:
      - .env
    networks:
      BRIDGE:
      LAN:
        ipv4_address: ${WEB_IPV4}
    healthcheck:
      test: ["CMD", "curl", "-f", "http://localhost/index.html"]
      interval: 30s
      timeout: 10s
      retries: 3
Networks and Volume Configurations: Bridging the Divide
Our microservices talk, and they need a network to converse. Docker Compose can define a bridge network, enabling internal communication between containers and facilitating a seamless flow of information. In addition, enabling external communication to containers from the rest of the network Docker networks definitions allow for the creation of a macvlan.
# Docker hos 'bash'
docker network create -d macvlan --subnet=10.220.0.0/24 --gateway=10.220.0.1 --ip-range=10.220.0.64/27 -o parent=eth0 LAN

mkdir /mnt/nas/nfs-1/volumes/${PROJECT}_mongo-db
# ./docker-compose.yaml file (continued)
networks:
BRIDGE:
driver: bridge
LAN:
external: true
volumes:
mongo-db:
driver_opts:
type: "nfs"
o: "addr=truenas.tallgray.net,nolock,rw,soft,nfsvers=4"
device: ":/mnt/nas/nfs-1/volumes/${PROJECT}_mongo-db" Our next stop will reveal how specific containers are dynamically configured through environment variables, which tailors each deployment uniquely. This magic is easily performed by way of the ‘.env’, or dotenv file.
# .env file:
# Project Variables
PROJECT=swmean
WEB_IPV4=10.220.0.66
WEB_PORT=80
BUSINESS_IPV4=10.220.0.67
BUSINESS_PORT=3000
DATA_PORT=27017

# MongoDB Variables
MONGO_INITDB_ROOT_USERNAME=root
MONGO_INITDB_ROOT_PASSWORD=password
MONGO_INITDB_ADMIN_USERNAME=admin
MONGO_INITDB_ADMIN_PASSWORD=password
MONGO_DB_URL=mongodb://${MONGO_INITDB_ROOT_USERNAME}:${MONGO_INITDB_ROOT_PASSWORD}@mongo-db:27017
Workflow Overview
Now that we have our project composition defined, let’s delve into how they actually work together to create a robust, lightweight, microservice-based application. The workflow involves the orchestrated collaboration of MongoDB, Express.js, Nginx, and our web interface. Here’s a step-by-step breakdown of the process:
1. Initializing the Database with MongoDB
Upon starting the application using Docker Compose, the MongoDB container takes the lead in initializing the database. This includes creating the necessary database, in our case, named ‘star_wars_db‘, and configuring an admin user with appropriate privileges.
The initialization process is orchestrated by the ‘init-mongo.js‘ script, which is copied into the MongoDB container. This script ensures the setup of the database, creation of an admin user, and handling any necessary permissions.
# ./mongo-db/Dockerfile

FROM mongo:latest
EXPOSE 27017
COPY ./init-mongo.js /docker-entrypoint-initdb.d/
// ./mongo-db/init-mongo.js

// Read environment variables from the .env file
const adminUsername = process.env.MONGO_INITDB_ROOT_USERNAME || 'root';
const adminPassword = process.env.MONGO_INITDB_ROOT_PASSWORD || 'password';
const databasesToCreate = process.env.MONGO_INITDB_DATABASES ? process.env.MONGO_INITDB_DATABASES.split(',') : ['star_wars_db'];

// Create an admin user with appropriate privileges for the database
db.createUser({
  user: adminUsername,
  pwd: adminPassword,
  roles: [
    { role: 'userAdminAnyDatabase', db: 'admin' },
    { role: 'readWriteAnyDatabase', db: 'admin' },
    { role: 'dbAdminAnyDatabase', db: 'admin' }
  ]
});

// Loop through the list of databases and create a user with readWrite role
databasesToCreate.forEach(dbName => {
  // Switch to the current database
  db = db.getSiblingDB(dbName);

  // Create a user with readWrite role
  db.createUser({
    user: adminUsername,
    pwd: adminPassword,
    roles: [{ role: 'readWrite', db: dbName }]
  });

  // Insert initial data or create collections as needed

  print(`User and initial data created for the '${dbName}' database.`);
});

// Ensure the 'mongodb' user has write permissions to /data/db
const result = run('/bin/chown', ['-R', 'mongodb:mongodb', '/data/db']);
if (result !== 0) {
  print('Failed to set ownership for /data/db');
} else {
  print('Ownership set for /data/db');
}
This sets the stage for our data management.
2. Express.js Connecting to MongoDB
Once the database is ready, the Express.js backend, encapsulated in the ‘app-server‘ service, connects to MongoDB. It exposes an API root endpoint (‘/‘) to retrieve data stored in the MongoDB database.
The Express.js configuration is handled in its Dockerfile and server script.
# ./app-server/Dockerfile

FROM node:16.6.2-bullseye-slim
WORKDIR /src
RUN apt update && apt install -y curl nano telnet
COPY ./src/package.json .
RUN npm install
COPY ./src .
CMD ["npm", "start"]
// ./app-server/src/server.js

const express = require('express');
const bodyParser = require('body-parser');
const MongoClient = require('mongodb').MongoClient;
const mongoURL = process.env.MONGO_DB_URL;
const app = express();

app.use(function(req, res, next) {
  res.header('Access-Control-Allow-Origin', '*');
  res.header('Access-Control-Allow-Headers', 'Origin, X-Requested-With, Content-Type, Accept');
  next();
});

app.use(bodyParser.urlencoded({ extended: true }));
app.use(bodyParser.json());

console.log("MongoDB URL:", mongoURL);
const mongoClientOptions = { useNewUrlParser: true, useUnifiedTopology: true };
const dbName = "star_wars_db";

app.get('/', function (req, res) {
  let response = [];

  MongoClient.connect(mongoURL, mongoClientOptions, function (err, client) {
    if (err) {
      console.log(err);
      throw err;
    }

    let db = client.db(dbName);
    db.collection("characters").find({}).toArray(function (err, result) {
      if (err) {
        console.log(err);
        throw err;
      }

      response = result;
      client.close();

      res.send(response ? response : []);
    });
  });
});

app.listen(3000, function () {
  console.log("app listening on port 3000!");
});
This establishes a robust communication link between our application and the MongoDB database.
3. Nginx as a Gateway
Nginx, represented by the ‘web-server‘ service, serves as a crucial gateway in our microservice architecture. It forwards requests from the web interface to the Express.js backend.
The Nginx configuration is defined in its Dockerfile and associated configuration files.
# ./web-server/Dockerfile

FROM nginx:latest
RUN apt update && apt install -y curl nano
COPY ./src/html/ /usr/share/nginx/html/
COPY ./src/conf/default.conf /etc/nginx/conf.d/
# ./web-server/src/conf/default.conf

server {
    listen       80;
    listen  [::]:80;
    server_name  localhost;

    location / {
        root   /usr/share/nginx/html;
        index  index.html index.htm;
        try_files $uri $uri/ /index.html;
    }

    location /api/ {
        proxy_pass http://swmean-app-server:3000/;
        proxy_http_version 1.1;
        proxy_set_header Upgrade $http_upgrade;
        proxy_set_header Connection 'upgrade';
        proxy_set_header Host $host;
        proxy_cache_bypass $http_upgrade;
    }
}
This ensures that incoming requests are correctly routed to our backend services.
4. Web Interface Interaction
The web interface, served by Nginx, facilitates user interaction. It makes AJAX requests to the Express.js backend (‘/api/‘) to fetch data dynamically. The JavaScript embedded in the web interface processes the received data, updating the HTML content to display information in an organized manner.
<!-- ./web-server/src/html/index.html -->

<!DOCTYPE html>
<html lang="en">
<head>
  <meta charset="UTF-8">
  <meta http-equiv="X-UA-Compatible" content="IE=edge">
  <meta name="viewport" content="width=device-width, initial-scale=1.0">
  <title>Microservice App</title>
  <link rel="stylesheet" href="css/styles.css">
</head>
<body>
  <h1>Star Wars Characters</h1>
  <div id="characters"></div>
  <script src="js/scripts.js"></script>
</body>
</html>
// ./web-server/src/html/js/scripts.js

document.addEventListener('DOMContentLoaded', function () {
  const charactersDiv = document.getElementById('characters');

  // Make an AJAX request to fetch data from the Express.js backend
  fetch('/api/')
    .then(response => response.json())
    .then(characters => {
      // Process the received data and update the HTML content
      characters.forEach(character => {
        const characterDiv = document.createElement('div');
        characterDiv.innerHTML = `<strong>${character.name}</strong>: ${character.description}`;
        charactersDiv.appendChild(characterDiv);
      });
    })
    .catch(error => console.error('Error fetching data:', error));
});
5. User Interaction
Users can now interact with the web page to view details about the Star Wars characters. The dynamic nature of the microservices architecture ensures that the data is seamlessly retrieved and updated, providing a smooth user experience.
This comprehensive workflow showcases the synergy of Docker Compose, MongoDB, Express.js, Nginx, and the web interface, resulting in a highly efficient and modular application architecture.
Once all files have been created, the complete file structure will look something like this:
.
├── .env
├── README.md
├── docker-compose.yaml
├── mongo-db
│   ├── Dockerfile
│   └── init-mongo.js
├── app-server
│   ├── Dockerfile
│   └── src
│       ├── package.json
│       └── server.js
└── web-server
	├── Dockerfile
	└── src
		├── conf
		│   ├── default.conf
		│   └── nginx.conf
		└── html
			├── css
			│   └── styles.css
			├── favicon.ico
			├── index.html
			└── js
				├── contact.js
				└── scripts.js
Security Measures
Ensuring the security of your microservices architecture is paramount. Adhering to security best practices within your organization is a foundational step. This includes implementing robust data encryption methods and securing both web and API endpoints with digital encryption. Regular security audits should be conducted to identify and mitigate potential vulnerabilities. While this article has demonstrated storing definitions in the project source file ‘.env‘, it must be emphasized that the importance of storing private or secret definitions in an external resource is crucial, and to recognize that security is an evolving landscape. Keep abreast of the latest security standards and customize your security measures to align with your organization’s policies!
Project Testing
Testing is the bedrock of a reliable software platform. A comprehensive testing strategy should encompass unit testing, integration testing, and user acceptance testing. Unit tests ensure that individual components function as expected, integration tests validate the interaction between different components, and user acceptance testing guarantees that the end product aligns with user expectations. Prioritize testing throughout the development lifecycle to catch and rectify issues early, ensuring a robust and reliable application.
Project Deployment
Before deploying your platform to a production environment, consider deploying it initially in a staging environment for final testing. This allows you to identify and address any unforeseen issues or discrepancies. Implementing a robust rollback plan is essential, providing a safety net in case issues arise post-deployment. Automated deployment tools and scripts can streamline the deployment process, ensuring consistency and reliability across different environments.
Conclusion
In the dynamic landscape of software development, the imperative to streamline processes is not just a necessity; it’s a catalyst for innovation. By commoditizing foundational resources and adopting a 3-tier microservice-based approach, developers and stakeholders can overcome the challenges of infrastructure management and accelerate development cycles. The real-world example from this former Network Engineer at Comcast exemplifies the transformative impact of such streamlined processes, underscoring the tangible benefits of efficiency and agility.
Next Steps
As you embark on your journey to streamline software development and embrace DevOps practices, consider implementing the discussed approach in a controlled environment. Experiment with Docker, GitHub, and Docker Hub to experience firsthand the acceleration of development cycles. Leverage the real-world case study as inspiration and adapt the template to suit your organizational needs. Engage with your team, share insights, and continuously iterate based on the evolving landscape of technology and development methodologies. Remember, the power to innovate lies in your hands, and the streamlined path to efficient software development awaits.
Feel free to share your experiences or ask questions! The GitHub repository for this project can be found here. Clone it, explore it, and adapt it to fit the unique requirements of your projects. Go DevOps!